Dreaming of those perfectly groomed, effortlessly full eyebrows you see all over social media? If you've been eyeing the 'laminated brow' trend but balking at salon prices, you're in luck! Learning how to laminate brows at home is a game-changer for anyone looking to enhance their natural brows with minimal effort and cost. Eyebrow lamination makes eyebrows look naturally fuller and more defined, smoothing, lifting, and setting your brow hairs into that coveted, brushed-up style. It's an easy, affordable, and totally worth-it beauty treatment that can transform your look. This guide will walk you through everything you need to know before you try the treatment at home, ensuring you achieve bold, beautiful brows right from your own bathroom.
What Exactly is Eyebrow Lamination?
Eyebrow lamination is a brow enhancement process that uses a chemical solution to shape and set the hairs, similar to a perm or chemical straightening treatment for your hair. Unlike microblading or tattooing, lamination is non-invasive and temporary, designed to enhance the appearance of your eyebrows by creating a fuller, more defined look. The process essentially relaxes the brow hairs, allowing them to be brushed into a uniform, lifted shape that stays put. This creates the illusion of thicker, more voluminous brows, filling in sparse areas and giving you that 'fluffy' aesthetic. The results typically last anywhere from 4 to 8 weeks, depending on your hair growth cycle and aftercare.
Why Laminate Your Brows at Home?
The allure of at-home brow lamination is undeniable. Beyond the convenience of doing it whenever you please, the primary draw is the significant cost savings. Salon brow lamination sessions can be quite expensive, and for a treatment that lasts only a few weeks, the costs can quickly add up. Fortunately, there are DIY brow lamination kits you can do yourself at home. As many have discovered, including myself when I tried at-home brow lamination for fuller, fluffier brows, it's so easy, so affordable, and so worth it. Instead of going the expensive route, you can use a DIY eyebrow lamination kit at home and still see amazing before and after eyebrow lamination results that are just as good as the salon.
Getting Started: What You'll Need
To laminate your brows at home, your best bet is to use an at-home lamination kit. These kits are widely available and usually include everything you need to laminate your brows. Typically, a kit will contain:
- A cleansing solution
- A perm solution
- A setting solution
- A nourishing oil or serum
- Spoolies or brow brushes
- Applicator tools
Before you even open the kit, remember this crucial advice: “So if attempting to laminate your own brows at home, be sure to follow the directions very carefully.” Every kit is slightly different, and adhering strictly to the manufacturer's instructions is paramount for safety and optimal results. Guided by expert instructions, you can achieve a bold brow style.
Your Step-by-Step Guide to At-Home Brow Lamination
Now, let's dive into the practical steps. Scroll ahead for a step-by-step guide on how to laminate your brows at home with all the key tips and tricks I've learnt along the way to get the best results. Remember to always prioritize safety and precision.
- Brianna How Lucky Are We Tattoo
- Women Poop Pants
- Liz Cho Wedding Pictures
- Lucky Blue Smith And Nara Smith
- Valentina Rent Live
Plan Ahead & Prep
- Patch Test: This is non-negotiable. Apply a tiny amount of each solution to a discreet area of your skin (like behind your ear or inner elbow) at least 24-48 hours before you plan to laminate. This helps ensure you don't have an allergic reaction.
- Gather Your Tools: Lay out your kit contents, cotton pads, timers, and anything else you might need.
The Lamination Process
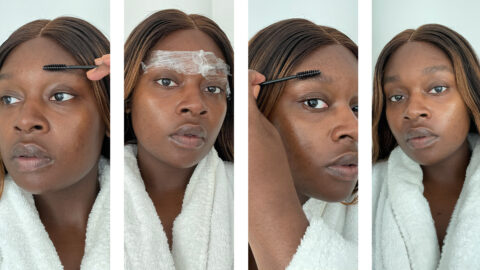
While specific steps might vary slightly by kit, the general process for how to laminate your eyebrows is as follows:
- Step 1: Cleanse Your Brows. Ensure your brows are clean and all product is removed using the cleansing solution provided in your kit. This is crucial for the solutions to penetrate effectively. Make sure your brows are completely dry before moving on.
- Step 2: Brush and Set Your Brows. Using a clean spoolie, brush the brows upwards and outwards into your desired shape. This is where you define the 'laminated' look. Some kits might instruct you to apply a lash glue or brow adhesive at this stage to hold the hairs in place. If so, apply it thinly and evenly, ensuring every hair has been coated and is positioned exactly where you want it.
- Step 3: Apply the Perm Solution. Carefully apply the perm solution (usually labeled "Perm" or "Lift") to your brow hairs. Use a thin, even layer, making sure to cover all the hairs you want to laminate. Avoid getting it on your skin as much as possible. Set a timer according to your kit's instructions. This is the most critical step for timing; leaving it on too long can damage your brows.
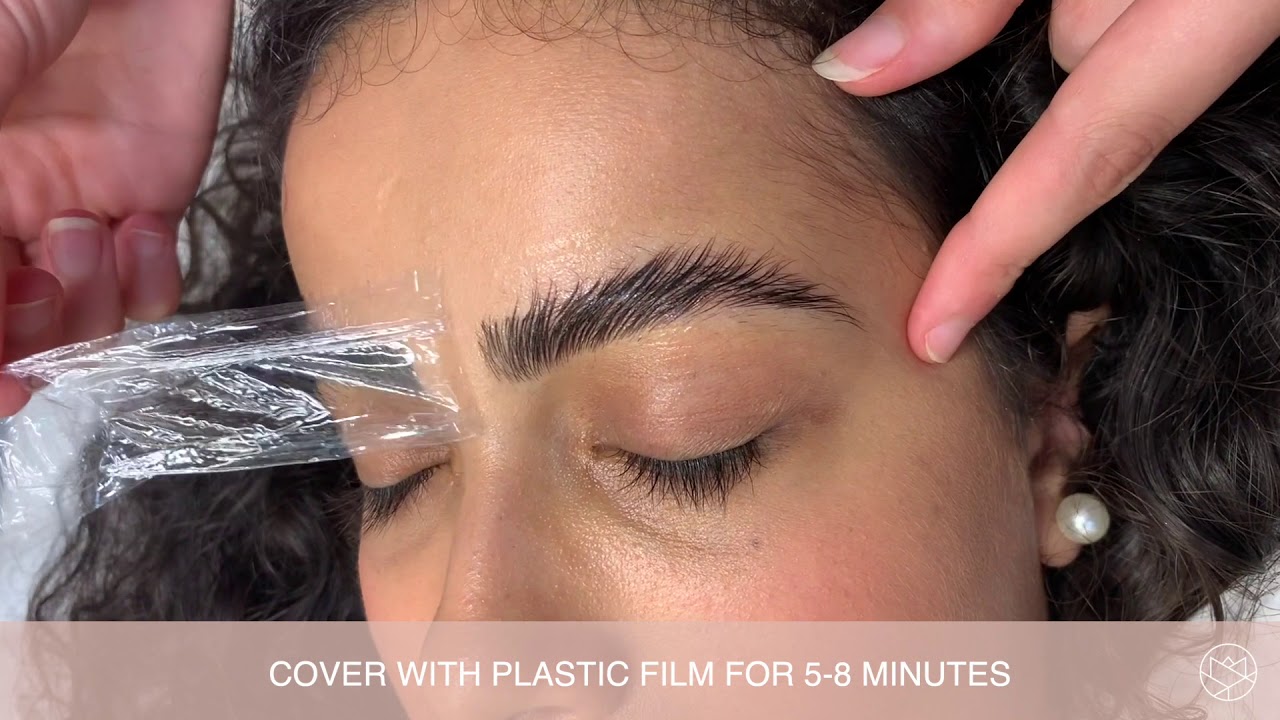
- Step 4: Apply the Setting Solution. Once the perm solution's time is up, gently remove it with a dry cotton pad. Then, apply the setting solution (often labeled "Fix" or "Neutralizer") to your brows, again ensuring even coverage. This solution locks the hairs into their new shape. Leave it on for the time specified in your kit.
- Step 5: Nourish Your Brows. After the setting solution has done its job, remove it thoroughly. Finish by applying the nourishing oil or serum. This helps rehydrate and condition your brow hairs after the chemical process, promoting healthy growth and maintaining flexibility.
Tips and Tricks for Success
- Less is More: Don't over-saturate your brows with product. A thin, even layer is all you need.
- Precision Brushing: Take your time in Step 2. The way you brush and set your brows initially will determine the final look.
- Follow Timing Religiously: This cannot be stressed enough. Over-processing can lead to brittle, damaged brows.
- Work in Good Lighting: Ensure you have clear visibility to avoid mistakes.
Aftercare for Long-Lasting Results
Proper aftercare is essential to maximize the longevity of your laminated brows and keep them looking their best. For the first 24-48 hours after lamination, avoid:
- Getting your brows wet (no showers, swimming, or excessive sweating).
- Using any oil-based products on your brows.
- Applying makeup to your brow area.
- Sleeping on your face.
After this initial period, continue to brush your brows daily with a spoolie to maintain their shape. Regularly apply a nourishing brow oil or serum to keep the hairs healthy and hydrated. This will help your lamination last the full 4-8 weeks.
Before You Try: Important Considerations
While learning how to laminate brows at home can be incredibly rewarding, it's not without its considerations. Always remember:
- Read Instructions: Reiterate the importance of following your specific kit's directions very carefully.
- Patch Test: Never skip this step. Allergic reactions can be severe.
- Not for Everyone: If you have very sensitive skin, open wounds, or certain skin conditions around your brows, it might be best to consult a professional or avoid lamination.
- Manage Expectations: While results can be amazing, they won't be identical to a professional salon job every time, especially for your first attempt. Practice makes perfect!
Unlock bolder, defined brows with eyebrow lamination! With some expert guidance, you can achieve a bold brow style that enhances your natural beauty. Whether you're aiming to master at-home techniques or simply prepare for a pro session, understanding the process empowers you to make informed choices for your brow journey.
Final Summary: At-home eyebrow lamination offers an affordable and convenient way to achieve fuller, more defined brows that last 4-8 weeks. By using a DIY lamination kit and carefully following the step-by-step instructions—from cleansing and brushing to applying perm and setting solutions—you can transform your look. Remember to prioritize a patch test, precise application, strict adherence to timing, and diligent aftercare to ensure safe, beautiful, and long-lasting results.
- How Old Was Keanu Reeves In Bill And Teds
- Kardashian Halloween Party
- Luke Bryan Spouse
- Alisha Washington Age
- Summer Justice Ward